
Synology DS925+ Setup | NAS Management
There are various models of Synology NAS devices which help people to manage the valuable data stored in their device memory. The NAS will make it more secure and reliable. One of the best models is the DS925+ NAS. Here we will discuss its Synology DS925+ Setup guide. We will include the Physical setup, hardware connection with the router, connection with the computer and Find Synology interface with DSM download steps.
Synology DS925+ Setup (NAS)
Hardware Connectivity
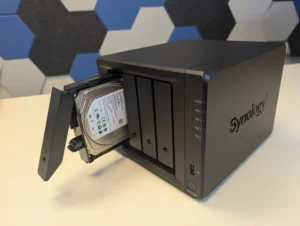
- The front panel has those little drive bays with latches. Press the button, pull the tray out. Don’t force it, these things slide out pretty smoothly.
- Take your hard drive (or SSD), drop it into the tray. Line it up with the screw holes.
- The trays have side clips, snap them in so you don’t need screws unless you’re using 2.5″ drives.
- For 2.5″, yeah, you’ll need the small screws Synology throws in the box.
- Once the drive’s locked in the tray, just slide it straight back into the bay until you hear the click. Push firm but clean so the connector seats properly.
- Same deal for each slot. Fill as many as you plan to use now.
- You don’t have to fill all at once, you can add later. But if you’re setting up a RAID from the start, get them all in.
Physical Connection with Router
Ethernet cable to the router. Just grab the LAN cable that came in the box, plug one end into the NAS, the other into a free LAN port on your router. That’s the backbone of the whole thing.
Plug in the power adapter, hit the button. Give it a minute. The status light will do its little dance before it settles.
Connection with the Computer
After connecting the NAS device with the router, you must connect it with the computer which you can do with the help of the below given steps:
- At first connect your computer with the same router which connects with the Synology DS925+ NAS device. You can use the Ethernet cable or WiFi.
- Then, open any browser on your computer and search the URL find.synology.com on the address bar.
- A Synology Assistant interface window will open up. Here, your computer will find the Synology NAS on the network.
- Select the model and click the Connect button given on the screen, now your computer will link up with the device.
- After that download the DSM (DiskStation Manager) with which you can manage your data easily.
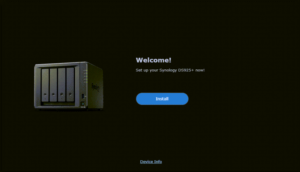
Download DSM via Synology Assistant
Find your NAS First
Open Synology Assistant. It’ll scan your network. If everything’s connected properly, you’ll see your DS925+ pop up. If not? Double-check your cables or make sure your router isn’t blocking it. Sometimes a reboot of both NAS and PC helps.
Select your NAS
Click on your DS925+ in the list. You’ll probably see it listed as “Not Installed” or “Ready to Install.”
Point it to the DSM file
Synology Assistant usually asks for the DSM .pat file. You can either let it download automatically or just go to Synology’s website, grab the DSM for DS925+. and have it ready.
Install DSM
Once you’ve got the .pat file, load it into Synology Assistant and let it do its thing. The NAS will start formatting the drives and installing DSM. Heads up: this wipes your drives, so if you threw in some old disks with data.
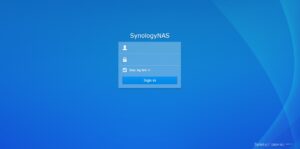
Wait, reboot, and log in
After the install, the DS925+ will reboot. Synology Assistant will show it again, this time with DSM running. You can now hop in through your browser (usually by typing in the NAS IP or using find.synology.com). Create your admin account, set up QuickConnect if you want, and you’re good.
Troubleshooting Tips: Synology DS925+ Setup
1. Stuck on DSM download? Use Synology Assistant, not the browser.
The web setup wizard loves to hang when downloading DSM. Just install Synology Assistant on your PC, find your NAS on the network, and push DSM manually. It’s faster and way less frustrating.
2. Drives not showing up? Reseat them.
The drive bays on these things are picky. One of my WD drives wasn’t getting detected, and it turned out the tray wasn’t fully clicked in. Pop the drive out, push it back until you hear the latch snap, and reboot.
3. Network not detected? Switch ports.
This one drove me nuts. The NAS was connected, but nothing showed up in Assistant. Swapped from one LAN port to the other, and it magically showed up. Also, don’t rely on Wi-Fi during setup, plug directly into your router or switch with Ethernet.
4. Stuck on “Repair” or “Migrating”?
If DSM keeps looping on migration or repair screens, it usually means the volumes got messed up during install. Easiest fix: wipe the drives from Synology Assistant and start fresh.
5. Long beeps / blinking lights = check RAM and drives.
If you’ve upgraded memory, reseat it. Run the health check once DSM is finally up, one bad drive will stall the whole setup.
Let’s end this guide for the Synology DS925+ setup where you have learned about how NSA devices connect with your PC or laptop. We have also shared the troubleshooting tips for the setup. If you still have any quarry left in your back of the mind, you can register it just by entering your email address.