
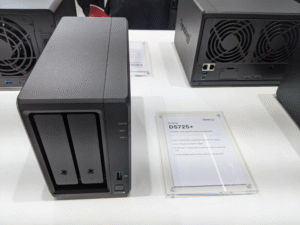
Synology DS725+ Setup
Synology is a big brand worldwide which presents so many devices to the internet users: routers, cloud devices, NAS storage devices. Here we are presenting a setup of one of the NAS devices which help you to store your valuable data easily and securely. So let’s start the Synology DS725+ setup: installation step-by-step via Synology Assistant & troubleshooting tips along with it.
Synology NAS DS725+ Setup
There are simple and easy steps to make the Synology DS725+ setup online with your computer and router. At first, you have to install the drives inside the device, then connect the NAS with the router, after that, connect its interface with the computer. This completes the setup and you can store all your things into it and make them secure.
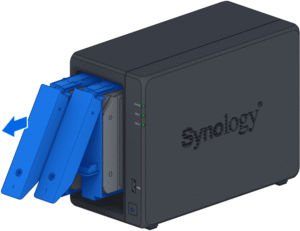
Installing Drives
- It is easy to slap your drives inside the Synology NAS DS725+ device. Just pull out everything from the box first.
- You will get drives, screws, ram, drive tray, and drive tray key to lock or unlock the drives.
- Pull out the drive tray and put the drives inside them, slide them into the NAS device and slap them in until you hear the click sound.
- Now lock them up with the help of the Drive Tray key and now it’s time to connect the NAS to power and router via Ethernet cable.
Connection with Router
- The DS725+ has those front slots to make sure your HDDs or SSDs are locked in tight. Then power cable in the back.
- Take the LAN cable that comes in the box. Plug one side into the back of the NAS, the other into your router.
- Doesn’t matter which port, as long as it’s a LAN (not WAN).
- Hit the power button on the DS725+. The blue light will blink, then go solid.
- If it doesn’t, you didn’t push the drives in right, or your power plug is loose.
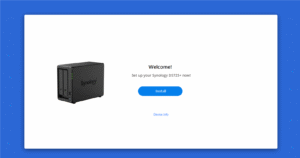
Install NAS with Synology Asstistant
- Connect your computer or laptop with the same router with which your Synology NAS setup is connected.
- Go to Synology’s website find.synology.com and grab the Synology Assistant software. Install it on your computer (Windows or Mac, doesn’t matter).
- Open Synology Assistant. It’ll scan your network. Give it a few seconds and your NAS should show up in the list.
- If you don’t see it, check your cables, check your router.
- Click on your NAS from the list in Synology Assistant. There’ll be an option like “Install” or “Connect.” Hit that.
- It’ll open a browser window. Now you’re basically inside the DSM (DiskStation Manager) setup wizard.
Install DSM to Manage
- The wizard will walk you through installing DSM (Synology’s operating system).
- You’ll get two options: let it grab the latest DSM automatically, or download it manually.
- Once DSM is installed, it’ll reboot.
- Then you set up your account username, password, server name. Keep the password strong.
- It’ll ask about Synology QuickConnect setup and updates.
- When you’re in DSM for the first time, go straight to Storage Manager.
- Make sure your drives are detected, and in the RAID or SHR configuration you want.
Troubleshooting Tips: Synology DS725+ Setup
The NAS won’t show up on the network
This is probably the most common one. You open it up, open Synology Assistant or try find.synology.com, and nothing.
- First solutions you must try, make sure the Ethernet cable is actually in the LAN port and not the WAN.
- If it’s still not showing, plug it directly into your router instead of a switch. Some managed switches block the initial broadcast.
- Last resort? Assign a static IP on your router’s DHCP table and reboot the NAS. That usually forces it to pop up.
DSM install stuck or failing
You grab the latest DSM file, throw it in, and it just hangs or errors out.
- Check the drives. If you slapped in old HDDs that had partitions from a previous system, DSM will choke. Wipe them clean first.
- Use Synology’s official site for the DSM file, not some mirror. The DS725+ is picky about versions.
- If it keeps looping, reset the box (hold the reset button until you hear a beep) and try again.
RAID or SHR setup failing
You try to create a storage pool and it errors out.
- Again, old data or weird partitions on the drives can mess with it. Clean them.
- Don’t mix and match ancient HDDs with brand new ones if you can avoid it. DSM will complain and sometimes just refuse to build the array.
- If you’re testing, start with a single drive setup just to get DSM stable, then add the others.
Can’t log into DSM after setup
So you finally get DSM installed, but your login just doesn’t work.
- Try the IP directly in your browser instead of the QuickConnect link. Sometimes QuickConnect takes a while to kick in.
- If your admin password isn’t working (happened to me after a reset), do the reset button trick again. Hold it until a beep, then you can log in with the default credentials and set a new password.
Slow transfer speeds right out of the gate
You set up everything and then realize your NAS is crawling.
- Check if you’re plugged into a gigabit port on your router.
- Use Cat5e or better cables. Old Cat5 will throttle your speeds.
- If you’re transferring from Windows, disable SMB signing in the DSM settings.
Fans ramping up like a jet engine
Brand new box, drives inside, and the fans sound like it’s about to lift off.
- Update DSM right away. Early firmware sometimes doesn’t handle fan profiles properly.
- Check drive temps. If your drives are running hot, the fans will go nuts. Maybe relocate the NAS or add some airflow around it.
Now , we are ending up this guide for the Synology DS725+ setup, hope you find it really helpful and find more. Click here for more information about Synology devices or issues.