Synology DS425+ Setup | Troubleshooting Tips
You will see so many Synology NAS devices like DS925+, DS225+, DS725+ and much more. One more device is DS425+ model. Here we will discuss this model “the Synology DS425+ setup”. Have a quick look at the installation steps and troubleshooting tips to make the setup error free.
Synology DS425+ Setup (NAS)
This section is all about how to install drives into your NAS, adding memory to it, connect to router, NAS to PC connection, & how to install DSM.

How to Join All Drives to NAS?
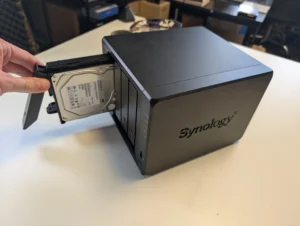
- Don’t even think about installing drives in while it’s on. Shut the DS425+ down, pull the power cable, and give it a second. Front cover slides off easily, don’t force it.
- Each drive bay has a tray. There’s a little latch you press and then the tray slides right out. No tools needed yet.
- Drop your HDD or SSD into the tray, line it up with the screw holes, and secure it.
- Some trays have those side clips so you might not even need screws unless you’re using smaller drives.
- Push the trays back into the NAS until you hear the click. Don’t slam them. Just firm pressure, seat them properly. Do all the drives you’re adding, one by one.
- After that lock up the drives with the help of the Drive tray key to secure them.
How to Add Memory to NAS?
- Find the memory slot. It’s usually near the CPU, tucked in a tight spot.
- On the plus side, Synology isn’t hiding it on a separate board, you’ll see a little SO-DIMM slot.
- Might be under the drive cage on smaller units, so you might have to squint and maneuver.
- Pop in the new RAM. Standard laptop RAM install here. Line it up, push it in at an angle, and then click it down flat.
- Synology is picky about RAM. You can use unofficial sticks, and most of the time it works fine, but if you want zero headaches, stick to Synology-approved modules.
How to Connect NAS with Router?
- Grab a LAN cable. One end goes into the NAS, the other into your router (not your modem, not some random switch, the actual router).
- Make sure the router is powered on, and double-check you didn’t jam it into the WAN port by mistake.
- Once that’s in, power up your NAS and wait a minute. You should see the LAN light flicker, if it’s not working, swap cables.
How to Connect NAS with PC or Laptop?
- Connect the computer with the same router that your Synology DS425+ NAS is linked with. You can use the Ethernet cable or WiFi.
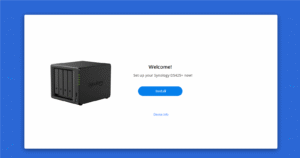
- Now, go into your PC or laptop’s web browser and search for Find.synology.com.
- A Synology Find interface will open up, here you will see the connected NAS device.
- Click install or Connect button to make a connection between the computer and Synology NAS.
- Now, you can install the DSM (DiskStation manager) from the Synology assistant and manage the data easily.

How to Install DSM via Synology Assistant?
- Select your NAS in Synology Assistant and hit Connect. You’ll get an option to install DSM.
- The tool will either grab DSM directly from Synology or let you upload the .pat file if you already downloaded it.
- Create your admin account, set a server name, and decide on network settings.
- If you’re not sure, leave it on auto/DHCP for now. You can tweak later from DSM itself.
- DSM will copy over, do its formatting magic, and restart the box.
- Once it comes back up, hit the IP in your browser, log in with the account you created, and you’re in DSM.
Now that you have installed your Synology DS425+ setup, you can also know about how to Set up QuickConnect easily.
Troubleshooting Tips: Synology DS425+ Setup
1. It won’t show up on the network.
Plugged in, green lights, but nothing shows up on Synology Assistant. Nine times out of ten it’s your router not handing out an IP. Restart the router, unplug/replug the NAS, and if that still fails, connect it directly to your PC with an ethernet cable and run the Assistant. That usually wakes it up.
2. DSM won’t install.
Sometimes you hit the “install DSM” button and it just hangs forever. If you’re stuck, try another browser. Chrome worked for me after Edge just sat there spinning. Also make sure the drive you’re using for DSM is properly initialized—wiped clean if you had anything old on it.
3. Constant beeping on Startup.
Pull drives out, shove them back in firmly, then reboot. If it still is not working, check the Synology manual beep codes, but most times it’s a loose bay.
4. Can’t access DSM after reboot.
You get it working once, then after a restart, DSM won’t load again. The DS425+ was hopping IPs every reboot, so the shortcut bookmark kept breaking. Lock it down to one IP, then it stays consistent.
5. Slow file transfers right out of the box.
Gigabit network, but the NAS was crawling. First, check if you accidentally plugged it into a 100mbps port (done that before). If that’s fine, disable “SMB signing” in the DSM file service settings—it eats speed for breakfast.
If you want to make the installation more easy or facing issues while installing Synology NAS type in your issue on our register form and resolve it in a few minutes.
