

Synology DS620slim Setup
Synology NAS has so many models that help users to manage the storage and close it within security. You can use the drives or use new updates to store the data over cloud (no drives. That device is called the Synology BeeStation, you can learn about it from here. But right now, we are discussing The Synology DS620Slim Setup (NAS).
We will share the setup instructions, DSM installation, QuickConnect setup, and troubleshooting tips.
Physical Synology DS620Slim Setup
The Synology DS620slim is a small yet powerful NAS built for homes and small offices. Its setup is simple if you follow the right order.
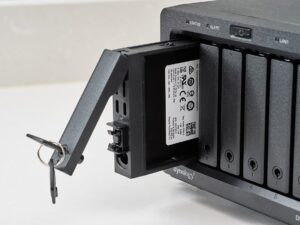
- First, install your drives. Slide open the bays, insert your 2.5-inch HDDs or SSDs, and lock them in. Make sure each drive clicks into place.
- Next, connect the NAS to power and your router using an Ethernet cable. Hit the power button and wait for the status light to turn solid.
- Now, open your browser and go to “find.synology.com.” This will locate your NAS automatically. Click “Connect” to start.
Install DSM for DS620Slim NAS
- You’ll be guided through DSM installation — Synology’s operating system. Choose “Install Now” and let it download the latest version. The process takes a few minutes.
- Once DSM is installed, create your admin account and set a strong password. Then, set up your storage pool and volume from the Storage Manager.
- Choose your RAID type based on how much redundancy you want. After storage setup, enable file sharing.
- Go to Control Panel → File Services, and turn on SMB or AFP depending on what your computers use.
- You can now map the NAS as a network drive or access it through Synology Drive. For remote access, sign in to QuickConnect and set up a unique ID. This gives you easy access from anywhere.
Finally, explore Synology’s packages — File Station, Drive, Moments, and more. They turn your NAS into a real data hub.
Keep the firmware updated and monitor disk health regularly. The DS620slim runs better with clean airflow, so avoid stacking it in tight spots.
Synology DS620Slim Setup: QuickConnect
- Start with your NAS powered on and connected to your router. Open Synology Assistant on your computer or go to find.synology.com in your browser.
- It will detect your DS620Slim on the network. Follow the on-screen prompts to install DSM (DiskStation Manager).
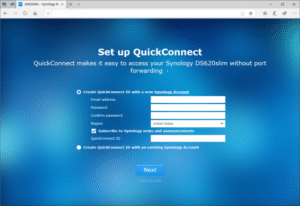
- Once DSM is running, log in to your NAS. Go to Control Panel → Connectivity → QuickConnect. Create or sign in to your Synology account.
- Enable QuickConnect and give your NAS a unique ID. This ID becomes your access link, something like “quickconnect.to/yourname”.
- That’s it—your NAS is now accessible anywhere with an internet connection. You can manage files, stream media, or share folders remotely without adjusting router settings.
Tip: Make sure QuickConnect is enabled only when needed. For better speed and security, combine it with Synology Drive or VPN when working from outside your home network.
Troubleshooting Tips: Synology DS620Slim Setup
Check the Basics
Make sure the drives are seated properly. Pull and reinsert each bay with the NAS powered off. Use Synology‑approved drives if possible. Also, check the power adapter connection. A loose one can cause random shutdowns or boot loops.
Network Setup Issues
If the NAS doesn’t appear in Synology Assistant, check your router’s DHCP list. Sometimes the IP gets assigned but not detected. Try connecting the NAS directly to your computer with an Ethernet cable and access via the Synology Assistant. Once found, set a fixed IP to avoid future connection drops.
DSM Installation Problems
If DSM installation hangs, reformat the drives using your computer first. Then restart the Synology Web Assistant and reinstall. Make sure your NAS has a stable internet connection during setup — wired is better than Wi‑Fi for initial setup.
Storage Pool and Volume Errors
If you see a “Volume Creation Failed” message, it’s often a mismatch between file systems or RAID setup. Delete the pool and recreate it with matching drive types. Btrfs works best for most users because it supports snapshots and data protection.
Slow Performance After Setup
Go to Resource Monitor and check CPU and memory usage. Disable media indexing if you’re not streaming content. Also, update DSM and all packages — older versions can slow things down.
Access and Permissions
Can’t access shared folders? Check File Services under Control Panel. Enable SMB or AFP depending on your device. Review user permissions and be sure “Read/Write” is ticked where needed.
Backup Not Working
Verify that Hyper Backup targets are reachable. For external drives, format them to ext4 or exFAT before use. For cloud, reauthenticate your credentials and ensure time sync under Control Panel > Regional Options.
Hope, you have followed every step of the Synology DS620slim setup and connected with your storage. If you are facing any problem you can register here and have a solution.