

Synology DS423 Setup
The Synology DS423 NAS is one of the incredible models in Synology NAS devices. It has four drive spaces and two cooling fans. With a simple and small design, you can place it anywhere in your home. The installation is pretty easy and quick, and we are going to provide you with step-by-step instructions. So, let’s start this Synology DS423 setup by connecting the hardware first.
Synology DS423 Hardware Setup
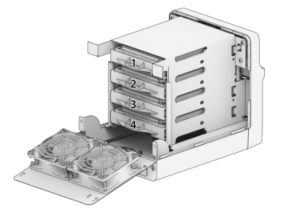
In the Synology DS423 content box, you will find the DS423 NAS, drive trays, Ethernet cable, Power cable, and a user manual. Let’s have a look at how to join all parts of the device:
- You have to install the drives first into the DS423 NAS device. Use a screwdriver to open the back cover.
- Lift the case and place it aside. Now, take a drive and place it into the drive tray. Fix it with the help of screws.
- Insert the drive tray into the NAS device, and be sure that it’s inserted properly into the device.
- Now, place the upper cover and close the back cover, and fix it with the screws.
It’s time to start your NAS device by connecting the power cord to the electric wall outlet and pressing the power button in the front.
You should also link up your router with the Synology DS423 NAS device. Use an Ethernet cable to make a connection between them.
DS423 Computer Connection
Now, you need to connect your computer to the NAS device. Start by connecting your PC or laptop to the same router with which the DS423 device is connected. Then, follow these steps:
- Open your computer’s web browser.
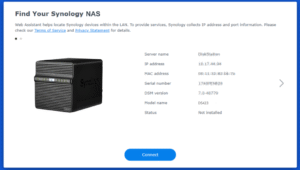
- Enter find.synology.com into the address bar of the browser.
- Search it. The Web assistant window will open up.
- It will search for the DS423 device within your network.
- You will see that the status of your Synology NAS is not installed.
- Click the Connect button to start the setup. After that, you need to install the DiskStation Manager to manage the NAS device.
DSM Installation
To install the DSM (Synology DiskStation Manager), you need Synology Assistant or the web assistant. Follow these steps below:
- Start your computer that connects with the same router that the Synology NAS is connected to via cable.
- Open the web browser and search for find.synology.com. Here, click the Connect button.
- After that, you’ll find the DSM application, click on it, and the application will start to download.
- Install the DSM, sign in with your Synology account, and now, you can manage the Synology DS423 setup easily.
QuickConnect Setup
This QuickConnect feature/software is used to manage and share files from a Synology NAS device to any other device. Let’s see how to set it up:
- Start your computer that’s connected to the Synology DS423 setup.
- Open the Control Panel and find the QuickConnect in it.
- Check the box in front of the QuickConnect option to enable it.
- It will ask for the Synology account. Just log in or register your Synology account.
- Create the QuickConnect ID and save it. Now, your QuickConnect setup is completed.
The Synology DS423 setup has been completed. Now, you should learn a few troubleshooting tips to make the installation error-free.
Troubleshooting Tips: Synology DS423 Setup
Below, you will get to learn the expert tips, which are already used, and by applying these, your device will work smoothly.
Start Smart: Easy Hardware Setup
Unpack your DS423 and lay out all parts. You need:
- Your NAS
- Hard drives (SATA)
- Network cable
- Power adapter
Slide open the drive trays, fix the drives with the provided holders and screws, then push them back in. Make sure each drive clicks into place.
Plug in the power and connect your NAS to your router using a LAN cable. Press the power button to start. Wait a few minutes for the NAS to boot up.

Find Your NAS on the Network
Open your browser and go to http://find.synology.com. If your NAS is not found:
- Check both ends of your network cable.
- Try Synology Assistant or a network scanner app to locate the device IP.
If still missing:
- Double-check that your router supports wired connections.
- Restart your NAS and your router.
Install DSM: The Synology OS
Once your NAS shows up in the browser, follow the on-screen setup. Create a new admin account. Install DiskStation Manager (DSM), the OS you’ll use to manage everything.
If installation fails:
- Use a different web browser.
- Make sure your internet connection is stable.
- Reset the NAS by holding the reset button until it beeps.
Hard Drive Issues: Quick Fixes
If you see disk errors or missing drives:
- Power off and reinsert the drives.
- Only use supported drives from Synology’s compatibility list.
- If drives are old, reformat before installation.
If the RAID setup fails:
- Try with fewer drives first.
- Make sure all drives are new or freshly formatted.
Network Problems: What to Check
If the NAS can’t connect or drops offline:
- Use a different LAN cable.
- Try another router port.
- Check LEDs on the NAS—no lights means a power or connection issue.
If you have a WiFi mesh, use wired connections for the best stability. Mesh systems sometimes cause problems for NAS access.
Other Setup Tips
- Use an Uninterruptible Power Supply (UPS) to prevent data loss during power cuts.
- Add extra RAM if you want to use heavy apps like Plex, but most home users won’t need more.
- Always update the DSM to keep your NAS secure.
Final Checks
Once installed:
- Create a storage pool and volumes.
- Set up automatic backups for your devices.
- Test basic functions by saving and reading a file.
If you ever get stuck, the Synology knowledge base and user forums offer simple, step-by-step help for all issues.
This is the end of the Synology DS423 setup journey. Now, if you are having any issues related to Synology NAS or other devices, you can register the issue and find a solution in minutes.