
How to Setup Synology QuickConnect Quickly?
QuickConnect is one the features of the Synology DSM and NAS device which helps users to access the NAS device on the internet without any port forwarding.
But you can enable it after you complete the Synology NAS setup. Here we will provide you with quick and correct instructions for the Synology QuickConnect setup via your computer and then tips to make the process error free.
Synology QuickConnect Setup
There are simple and easy steps to complete the Synology QuickConnect setup which are given below one by one and step by step. Just follow them.
- Get into DSM: Open up your Synology NAS and log into DSM. Type in your NAS’s local URL address is find.synology.com also called Synology Assistant.
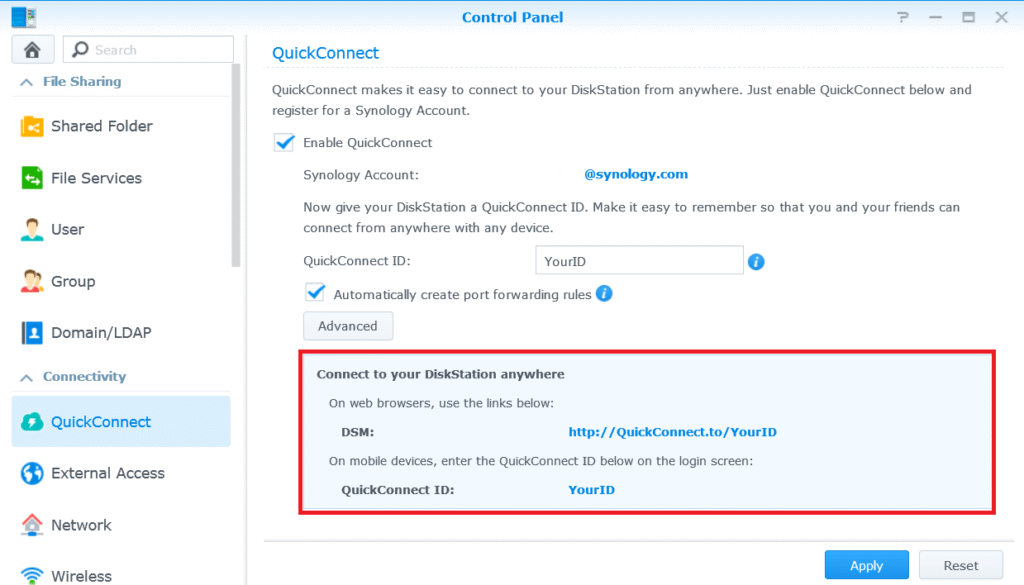
- Go to QuickConnect settings: Once you’re inside DSM, hit the Control Panel. Look for QuickConnect under “Connectivity.” If you don’t see it, you might be on an older DSM version then it’s usually under External Access.
- Sign in with Synology Account: This part trips people up. QuickConnect needs you to be logged into a Synology account. So yeah, if you haven’t already, sign up. It’s free. Just pop in your email, make a password, and you’re good. Once that’s done, DSM will ask you to link your NAS to that account. Do it.
- Enable QuickConnect: Check the box that says Enable QuickConnect. Then, it’ll ask you for a QuickConnect ID. That’s basically your custom shortcut to your NAS. Keep it short, easy, and unique.
- Test QuickConnect: Once you’ve saved it, you’ll get a link. Open that on your phone or laptop (outside your home Wi-Fi if you want to really test). You should hit your NAS login page instantly. If not, either your firewall’s blocking it, or DSM didn’t finish registering. Nine times out of ten, just wait a couple minutes and try again.
- Check permissions: Here’s where people get stuck — even if QuickConnect works, not every user can actually log in. Head back into Control Panel → User → Permissions and make sure the account you’re trying to use has rights to access whatever app you want (File Station, Drive, Photos, etc.).
Hope you have learned all the process of Synology QuickConnect Setup via Synology assistant/DSM. Now have a look at the tips and solutions.
Troubleshooting Tips
- If you’re paranoid about security, enable 2FA for your Synology account right away. QuickConnect bypasses port forwarding, but still — don’t leave it wide open.
- If QuickConnect feels slow, don’t panic. It’s relaying through Synology’s servers sometimes. For faster speeds, set up DDNS + port forwarding later.
- Write down your QuickConnect ID. Don’t ever forget it.
The Conclusion
Hopefully, you have followed all the steps given above and completed the Synology QuickConnect setup. Now, you can connect with the NAS directly on the internet. If you want any more assistance about the feature you can reach out to experts via this platform.