
Synology DS2422+ Setup
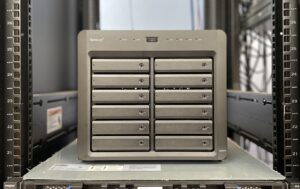
One of the big NAS memory system management devices is DS2422+ which has 12 drive trays space, 2 memory RAM slots, and big 2 system fans for cooling the device.
Here you will get to know about how to install it in your home in minutes which includes: hardware setup, Linking router, connecting with computer via Synology find interface. After all that, we will guide you to install the DSM via web assistant and troubleshooting tips to make the setup error free.
Synology DS2422+ Setup (NAS)
Let’s learn the main thing: how to connect all the components in the DS2422+, link your router and PC, then complete the Synology DS2422+ setup with installing the DSM.
Hardware Specifications
This is one of the big Synology NAS devices which has a big memory storage of 12 drives and you can also add RAM of 2 slots. For Cooling the system, you will get the 2 big cooling fans which you can also replace if some issue occurs.
You can join drives and RAMs with the help of the simple steps given below:
- There are trays inside the NAS device which you have to pull out and put the drive in.
- Then, simply slide the drives inside the device and lock them in with the help of the Drive tray key.
- After that if you want to add more RAM into the device, there are 2 slots for that inside the NAS.
- Pull out the trays and on the upper side of the device, you will get to see the Slots. Just place the RAM into that.
Now you can connect the NAS device with the power and router.
Connection with the Router
Place the DS2422+ device near the router and use the Ethernet cable to connect them both. There is an Ethernet port on the back of the NAS, just connect one end there. The other end will go into the router’s LAN port. Now, you can power on the NAS and link your computer or laptop.
Link with the Computer
Go into the web assistant from your computer and connect both of the devices. Follow these steps:
- Connect the PC with the same WiFi router via Ethernet cable or WiFi which NAS is connected to.
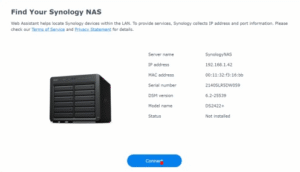
- Open any browser, and search the URL find.synology.com. The web assistant will open up.
- In this window, you have to find the Connect button, by clicking the button you will link the NAS with the computer.
Install DSM via Web Assistant
- open a browser and type: find.synology.com. That’s Synology’s Web Assistant. It scans your local network and should spot your NAS.
- You’ll see your NAS pop up on screen with a “Connect” button. Click it. If it says “Not Installed,” that’s good—you’re about to put DSM on it.
- Click Set up → Install Now. The NAS will pull the latest DSM version straight from Synology’s servers.
- If your internet is slow or flaky, skip that and use Manual Install. For that, you need the DSM .pat file from Synology’s download center.
- It’ll wipe your drives. Let it run. The NAS will reboot a couple of times.
- After reboot, Web Assistant will reload. It’ll ask you to set a server name, admin account, and password. Do it. Write that password somewhere safe.
- You’ll land on DSM’s login page. Log in with the account you just made. That’s it, you’re inside DSM now.
Troubleshooting Tips: Synology DS2422+ Setup
Drives not showing up in DSM
You stick in your drives, boot it up, and DSM pretends nothing’s there. Usually, it’s because the drives aren’t seated properly. Pull them out, re-seat them, make sure they click in. Also check the compatibility list on Synology’s site. Some drives just won’t play nice.
Stuck on “find.synology.com” screen
If your NAS isn’t popping up on the browser, don’t waste an hour refreshing it. Use Synology Assistant instead. Download it on your PC/Mac, it finds the NAS on your network directly. If it still doesn’t show up, check if your router is blocking it—sometimes DHCP just doesn’t hand it an IP. Manually assign one if you have to.
DSM install keeps failing
This usually means either a bad download or corrupt install file. Don’t keep retrying the same file. Go to Synology’s site, grab the latest DSM manually, and upload it during setup. Saved me a lot of time. Also, try a different browser if the upload freezes—Chrome sometimes stalls for no reason.
Can’t access DSM after reboot
So you installed DSM, rebooted, and now can’t log in? Nine times out of ten, it’s an IP address change. Your router gave it a new one. Go back into Synology Assistant or your router’s DHCP list and find it. Best fix: assign a static IP from the start. Saves you from chasing it later.
Fans running too loud
The DS2422+ can get noisy if the system thinks it’s overheating. Open DSM, go into Control Panel → Hardware & Power → Fan Speed Mode. Set it to “Cool Mode” only if temps are high. If it’s running loud for no reason, pop the cover and clean the dust filters. The stock fans are sensitive.
Network speed crawling
Hooked up 10GbE but only getting gigabit speeds? Check your cables first—seriously, half the time it’s just a Cat5e cable when you need Cat6a or Cat7. Also, make sure your switch actually supports 10GbE. In DSM, go to Control Panel → Network → Network Interface and confirm it negotiated the speed properly. If it’s stuck at 1Gb, it’s the cable or switch.
So this is the wrap up for this Synology DS2422+ setup, hope you have completed the installation. Now, if you are struggling with any step or facing an issue, feel free to fill the registration form and get it resolved.