
Synology Router Setup & Login
The Synology brand is one of the best networking device distribution companies. Synology provides world Cloud services through the Beestation, managing the storage through the NAS device, and WiFi services through the routers.
Here , you will get to know about how to set up a Synology router. There are 4-5 modals that have the same method to install. We will start straight with the Hardware connection and then explain the Synology router login process with the help of the Synology finder.
At last, after the Synology router setup, we will share troubleshooting tips and solutions for the secure setup and boost the network in your home.
Synology Router Setup
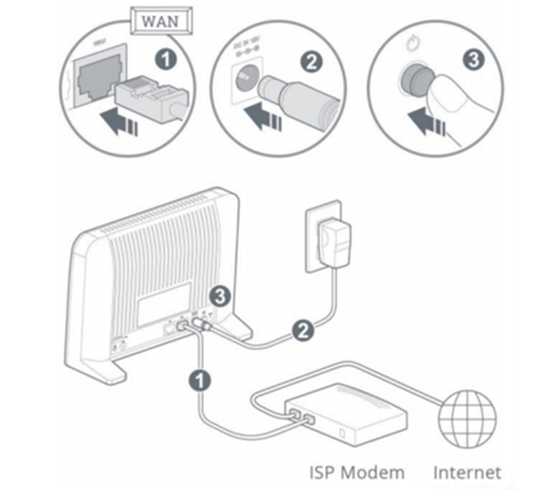
Hardware Connection
Find the WAN port on the Synology router. It’s usually a different color from the LAN ports, sometimes blue or marked “Internet.”
- Grab an Ethernet cable and plug it from the modem’s Ethernet port straight into that WAN port.
- One end in the modem’s LAN port, one end in the WAN port of the router. Done.
- Then simply turn on the modem first and then router. Give them a minute at least to pair with each other.
Now, you have to configure the Synology router with the help of your computer/laptop. Just have a look at the Synology router login interface procedure.
Synology Router Login (Configuration)
To log into the Synology router login interface, you need to connect any computer or laptop with the router network. You can either use the Ethernet cable or SSID details of the router which are given at the back of the router label. After the connection you should follow these steps:
- Open a browser. Chrome, Firefox, Edge. In the address bar, type: router.synology.com and hit Enter.
- If that doesn’t work (sometimes it doesn’t), try the IP address directly: 192.168.1.1.
- One of these will load the Synology Router Manager (SRM) login screen.
- Here you need to create a Synology account which you can use to log into the Synology router manager (SRM).
- After that, customise your new router’s SSID username and password with which you will connect with the router’s network after the setup.
Now, you have to select one of the router’s mode which are:
- Wireless router mode
- Wireless AP (access point) mode
- External access to SRM
For Wireless Router Mode
By selecting the Wireless router option the router will work as the normal Wifi router and provide Wireless signals and manage its settings via DS router app or interface.
For Wireless AP Mode
By selecting the AP mode, the router will work as an Access point router with which you can connect any other router too with the help of the Ethernet cable.
The recommended option in your case is Wireless router mode.
After selecting the router mode, the next page will show up with connection type, username & password for the new Synology network SSID details. Just choose the connection type, enter the username and password as your wish and complete the Synology router setup procedure.
Synology Router Login via DS Router App
At first, you need to download the DS router app in your phone or tablet and then follow these steps:
- First up, make sure your phone is connected to the Synology router’s network via Wi-Fi.
- Then open the DS router app and tap on the “Set up New router” button.
- If you are already managing another synology router then just tap the “+” icon.
- You will connect to the Synology router and then you should choose the connection type.
- At the next page, you need to enter the new SSID username and password to finish the Synology router setup.
You will also get to the router firmware update page, where the app will check for the latest update and after that the router will reboot itself.
After the reboot, you can connect with WiFi and access the internet easily.
Major Settings that User Must Manage
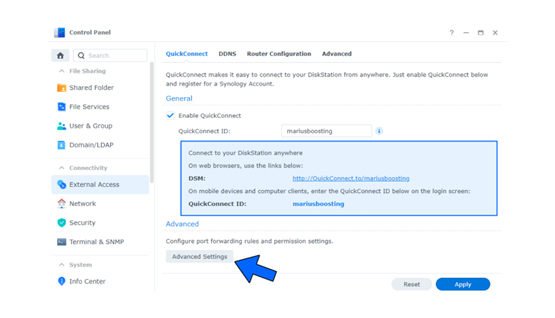
Setup QuickConnect
The QuickConnect is a feature of Synology which helps user to manage the Synology router over the internet without any IP address. To set it up, you can use either SRM or DS router app.
With SRM:
- Open the network center > internet > select QuickConnect & DDNS
- Then Enable QuickConnect feature from here.
- Don’t have any Synology Account, Just click on the Register Now button. Enter the details and then create a new account.
- Then create the new QuickConnect ID and link your Synology router with it.
- After that, you need to click Apply to save all your settings that you have adjusted just now.
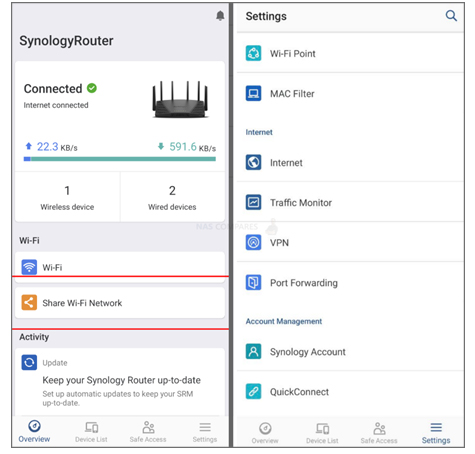
With DS Router App:
- Open the DS router app and Go to Settings.
- Select the Account management > then choose QucikConnect.
- Here you have to toggle the Enable QuickConnect option.
- Now, you can use the features easily from the DS router app.
Manage Firmware Updates
- To update the Synology router you need to visit the official Synology Download center and download the latest firmware file for your router.
- Then click on the “Manual SRM Update” button. Select the Browse button and select the downloaded firmware file.
- Choose the Apply button to start the update and after that it will restart once then you can use the internet services again.
Troubleshooting Tips From the Expert
If router.synology.com isn’t Loading
What usually works better? Direct IP. Open your browser and try 192.168.1.1. If that doesn’t pop up, sometimes Synology ships with a different IP (seen 192.168.0.1 before). Worst case, check your PC’s network gateway—whatever IP that shows, that’s the router.
Stuck at “No Internet”
If it says no internet during the setup wizard, try this:
- Restart your modem (power it off for like 30 seconds).
- After that, power up the router.
- Plug the modem into the router only after it’s booted up.
Wi-Fi Showing But no Internet
So you can connect to Wi-Fi, but nothing loads? That’s usually a DNS issue. Go into network settings on the router and manually set DNS to Google’s (8.8.8.8 and 8.8.4.4) or Cloudflare (1.1.1.1). I’ve fixed a ton of “blank page” issues just by changing DNS.
Router Keeps Rebooting or Hangs
Check the power outlet first. Sometimes flaky adapters can cause random reboots. If that’s not it, update the firmware. Download it directly from Synology’s site on a computer, then manually upload it through the router interface. Don’t trust the auto-update if you can’t even stay online.
Can’t Log Back in After Setup
Once setup finishes, Synology sometimes changes its own IP. If you can’t log in again, try the Synology Router mobile app—it usually finds the box. Or, press and hold the reset button for 4 seconds (soft reset). That resets the login but keeps your internet settings intact. If you hold for 10 seconds, that’s a full factory reset (last resort).
Slow Speeds (LAN or Wi-Fi)
Test wired first. If wired speed is good but Wi-Fi doesn’t even work, check if you’re stuck on 2.4GHz. Synology sometimes defaults devices there even if 5GHz is available. Force your device onto 5GHz or create separate SSIDs for 2.4 and 5.
If the wired connection is slow, check if the port is negotiated at 100Mbps instead of 1Gbps. Go into the router interface and confirm the link speed.
If Nothing Else Works
Factory reset. Hold reset for 10 seconds till it beeps, then start fresh. Remember it will clear out all the adjusted settings and you have to start the Synology router setup from the start.